


Roof Racks for Tesla Model Y
The Model Y Roof Racks are meant to carry bicycles, ski boxes, canoes or any type of bulky items. Of course, you need the right carrier for your item to transport safely. Like a bicycle carrier for transporting bicycles for example.
The design of the roof racks allows for highly aero dynamic efficiency. More than standard roof racks.
The Model Y Roof Racks use T-slots to attach carriers and can carry up to 65kg. The racks require a 20x20mm T-slot from the carrier.
Roof Racks locks
The roof racks are quiped with a lock. These locks make it difficult to remove and steal the racks from your car. The locks works with a key (+ spare) and a mechanism where locking them causes the screw nut to lock in place.
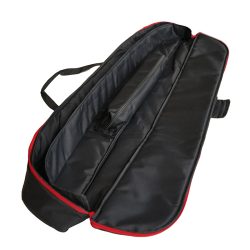
Storage bag for Roof Racks
We developed a robust Roof Rack bag for storing your roof racks while not in use. The bag prevent from being scratched or damage; two seperate compartment prevent the racks from scratching each other. Further it provides an internal pocket with zipper for storing the small parts so you dont loose them. The handles make it easy to carry and to hang it in your garage.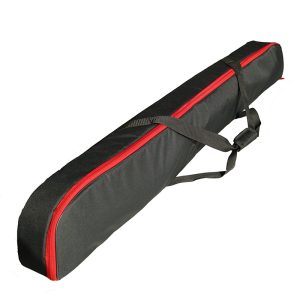
The bag comes for free with the Roof Racks. That is a € 49,95 save!
For more information about bag, check here.
A bit about wind noise
This is the short answer: Tesla cars hardly makes any noise, so wind noise from the racks are just more apparent!
Tesla cards have no noisy internal combustion engine and low wind noise due to the high aerodynamic design. The main noise comes from the tires.
The Teslavie Roof Racks are, just as the Tesla cars, are highly aerodynamic and hence produce less wind drag and noise than other roof rack models.
Installation
- Thoroughly clean the vehicle’s roof around the location of the glass. Especially around the Roof Rack entry markings | V |.
- Apply one protective film to the front driver side of the vehicle and aligning the edge of the tape with the edge of the trim line. Repeat for the other three corners of the car.
- Keeping the clip tool in place and carefully insert a clip at the arrow location.
- Make sure the clip is engaged in the metal receiver under the glass. Repeat steps 3 and 4 for the other corners of the car.
- Place the front driver side pad over the clip on the front driver side. Use the icon on the silicon pads to identify and install the correct pad in the proper location. Repeat this for the other corners of the car.
- Make sure all four clips are engaged, properly aligned and in the upright position. Then, carefully place the front and rear crossbars over the pads.
- Install the nuts and hand tighten onto each of the towers.
- Tighten the nuts with the spanner carefully. DO NOT overpressure the nuts! Stuck is stuck and when stuck it should be left as is.
- Test that the front and rear crossbars are securely installed by pulling vigorously in all directions.
- Place the covers. Start with the bottom edge, then press the top into place.
If you have any problems or concerns, contact us, or send as a DM on Instagram or Facebook.

Reviews
There are no reviews yet.